

How to use containers in data science with Docker and Azure: Part 3

In the first two parts of this series, I described how to build containers using Dockerfiles, and then how to share and access them from Azure. I then introduced data persistence using managed volumes and shared file systems, effectively developing locally with a globally accessible persistent state.
In this part, we’ll extend the container, persistence, and data science concept using multiple containers to create a more complex application. We’ll combine Python, a database, and an external service (Twitter) as a basis for social analysis. We’ll package these components into a docker application and move this to Azure.
Multi-Container Applications
If you’re using containers, you are effectively using small self-contained services that when combined with other containers provide greater flexibility than when all the services are held and managed within a single large virtual machine. How then, do you ensure that these containers are treated as part of a single larger application? That they all start up together, in the right order, and that they are shut down as a single unit. This is where docker-compose is useful.
Docker Compose is a tool that manages multi-container applications. It uses a docker-compose.yml file to define constituent containers, services, storage volumes, container behaviour, Dockerfiles, common configuration and data files (among other things) – together encompassing a multi-service application. A benefit of this approach is that the application is built, started, stopped, and removed using a single command. Another benefit is that these containers get added to a common network (and local DNS service), so it is possible for each container service to refer to the others simply by their container name.
If you don’t have docker-compose in your docker environment, you’ll need to install it.
Before we start, let’s create a working directory for our application with some predefined directories and files. We’ll modify each of the files as we go.
$ mkdir -p config containers/jupyter
$ touch config/jupyter.env containers/jupyter/Dockerfile docker-compose.yml
$ tree
.
├── config
│   └── jupyter.env
├── containers
│   └── jupyter
│       └── Dockerfile
└── docker-compose.yml
Let’s start with the docker-compose.yml file:
version: '3'
services:
  jon_jupyter:
    build: containers/jupyter
    ports:
      - "8888:8888"
    volumes:
      - jupyter_home:/home/jovyan
    env_file:
      - config/jupyter.env
  jon_mongo:
    image: mongo
    ports:
      - "27017:27017"
    volumes:
      - mongo_data:/data/db
volumes:
  mongo_data:
  jupyter_home:
The version here relates to Docker Compose syntax. All versions are backward compatible. If no version is specified, then Version 1 is used.
This will build an application comprised of two containers:
- jon_jupyter will be built based on the Dockerfile contained under the local directory containers/jupyter. It exposes port 8888 and locally mounts a managed Docker volume called jupyter_home to an internal container directory called /home/jovyan. An environment file called env contains a number of variables in the format VAR=VAL to allow us to parameterise scripts and reference variables within containers.
- jon_mongo is based on a standard mongo image. It mounts a Docker managed volume mongo_data onto an internal container directory called /data/db, which is mongodb’s default data file location. I’ve also exposed port 27017 on this so that I can use tools on my host machine to query the database.
Lastly, the volumes mongo_data and jupyter_home will be created automatically if they don’t already exist.
Here are the contents of containers/jupyter/dockerfile:
FROM jupyter/scipy-notebook
USER root
RUN conda install --yes --name root python-twitter pymongo
RUN conda install --yes --name root spacy numpy
RUN python -m spacy download en_core_web_sm
RUN python -m spacy download en
USER jovyan
ENTRYPOINT ["jupyter", "notebook"]
We could build our python environment from scratch including the underlying operating system, library configurations, and then selective python packages. What I’ve done here however is base mine on a pre-configured data science environment. For this, we’ll start with a scipy environment using docker-stacks. Jupyter Docker Stacks provide ready-to-run Docker images containing Jupyter applications and interactive computing tools where many of the necessary packages, and library combinations have already been thought about. We then install some additional python packages and start our Jupyter notebook service.
We use docker-compose to build and start the constituent containers. The ‘-d’ flag starts this as a detached service.
$ docker-compose up -d --build
Building jon_jupyter
.
.
.
Successfully built e95ac5aefb45
Successfully tagged mc-1_jon_jupyter:latest
mc-1_jon_jupyter_1 is up-to-date
mc-1_jon_mongo_1 is up-to-date

 $ docker-compose ps
       Name                    Command           State   Ports
-------------------------------------------------------------------------------
mc-1_jon_jupyter_1  jupyter notebook             Up     0.0.0.0:8888->8888/tcp
mc-1_jon_mongo_1    docker-entrypoint.sh mongod  Up     0.0.0.0:27017->27017/tcp

 $ docker exec mc-1_jon_jupyter_1 jupyter notebook list
Currently running servers:
http://0.0.0.0:8888/?token=a5b519010b0a37d52129f4f5084210b18fb7e14798ea586b :: /home/jovyan
$
Once the application has been built, I then check the status of each container using the docker-compose ps command – each service has a status of up.
I also query the Jupyter container for the token associated with the Jupyter notebook, I can use the URL returned (http://0.0.0.0:8888/?token=a5b519010b0a37d52129f4f5084210b18fb7e14798ea586b) to access the service directly from a browser on my host machine. Clicking on this should also open a browser with the service running.

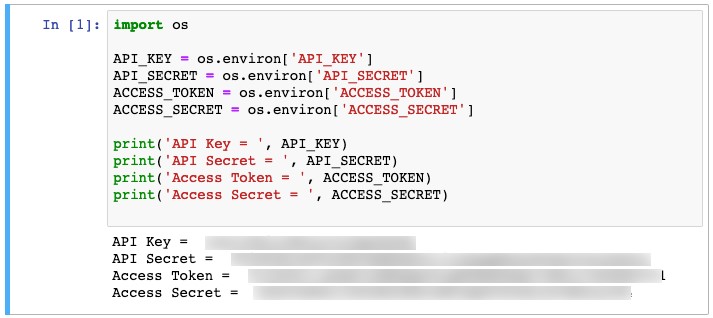
We’re going to extract some content from Twitter, so before you continue, you’ll need some API credentials to permit this. Here is a good step-by-step guide on how to get these. When you have these, place them in your config/jupyter.env file.
Here is my jupyter.env file. For obvious reasons, I’ve hidden the values. For the same reasons we’re going to use environment variables to reference these rather than have them hard coded in our notebook. This example assumes that some code might be stored in say a GitHub account, but that the values themselves are only available within your relatively secure container. If you pull that notebook it can then automatically use your credentials. In a later part of this series, I’ll describe how to use Azure Key Vault to store and access sensitive data much more securely:
API_KEY=xxxxxxxxxxxxxxxxxxxxxxxxx
API_SECRET=xxxxxxxxxxxxxxxxxxxxxxxxxxxxxxxxxxxxxxxxxxxxxxxxxx
ACCESS_TOKEN=xxxxxxxxxxxxxxxxxxxxxxxxxxxxxxxxxxxxxxxxxxxxxxxxxxx
ACCESS_SECRET=xxxxxxxxxxxxxxxxxxxxxxxxxxxxxxxxxxxxxxxxxxxxx
The docker-compose.yml file defines these as part of the Jupyter environment, and not the Mongo environment. If you wanted to share common environment variables, you could reference a common file in an env_file section within each container service. Let’s also confirm that those environment variables are present for us to use
$ docker ps
CONTAINER ID     IMAGE               COMMAND                  CREATED       STATUS          . . .
51e59897b9d5     mc-1_jon_jupyter    "jupyter notebook"     15 seconds ago   Up 7 seconds   . . .
a8df6b8d330a     mongo               "docker-entrypoint.s…" 15 seconds ago   Up 7 seconds   . . .
$
$ docker exec -it 51e env | grep -iE "api|access"
API_KEY= xxxxxxxxxxxxxxxxxxxxxxxxx
API_SECRET= xxxxxxxxxxxxxxxxxxxxxxxxxxxxxxxxxxxxxxxxxxxxxxxxxx
ACCESS_TOKEN= xxxxxxxxxxxxxxxxxxxxxxxxxxxxxxxxxxxxxxxxxxxxxxxxxxx
ACCESS_SECRET= xxxxxxxxxxxxxxxxxxxxxxxxxxxxxxxxxxxxxxxxxxxxx
$
From the main Jupyter page, let’s create a new Python 3 notebook and we can start to work with all our services.
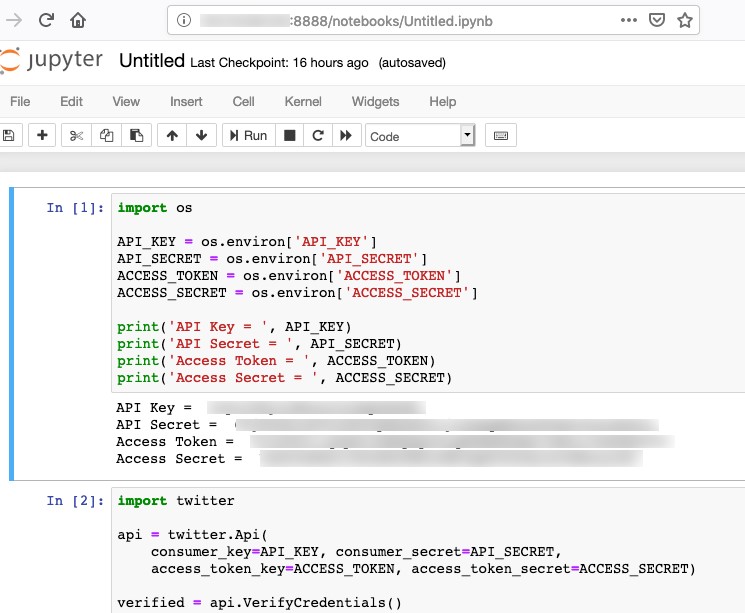
In my new notebook, I assign local notebook variables to the environment variables that were created as part of the container build process:
I can now use these credentials to connect to the Twitter service. VerifyCredentials() shows that I have successfully connected.

Let’s progress one step further. From the first container (hosting Jupyter/scipy etc.), I connect to the second container holding the Mongo service. I search Twitter for 100 tweets containing the word ‘Humous’ and insert them into the database.
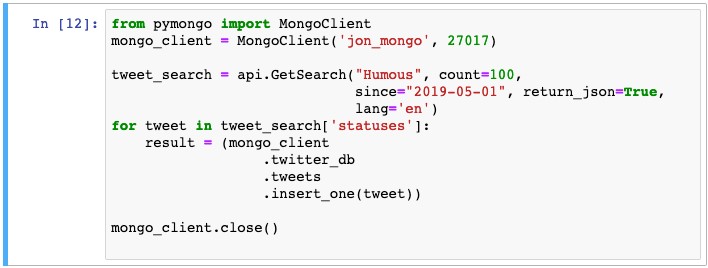
There are a few things to note here: Firstly, before I run this, there is no database called twitter_db nor a collection called tweets. These will be created after the first call to insert_one(). Secondly, the mongo client is connecting to the database service on ‘jon_mongo’. It knows how to find that network point because docker-compose packaged both containers inside a local network allowing each of them to refer to each other by their service name (from the docker-compose.yml file).
I’ll now pull those tweets from the database and apply some basic textual analyses. But first, I’ll create a simple function that identifies nouns, verbs, and entities within text.

I can now analyse each tweet as they’re read from the database:
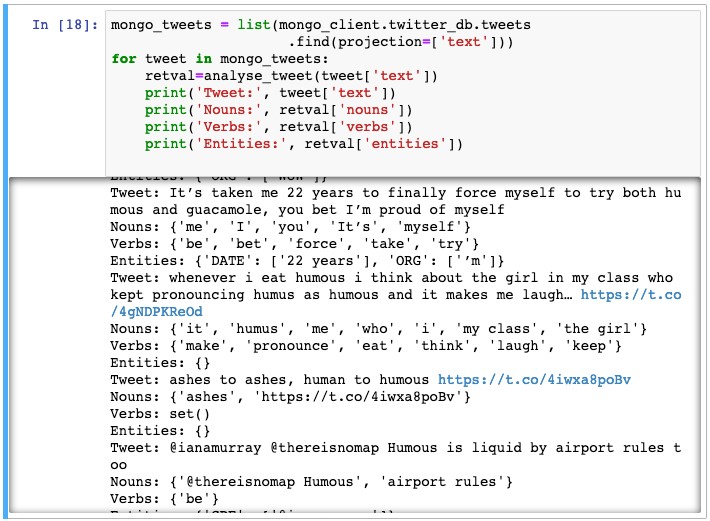
This is a very simple example, but you can see that from here we can extend the analysis. We stored the entire Tweet payload, which includes a lot of additional metadata, not just the textual content. So, we may also want to consider what a network graph of humous eaters looks like. Geographically, where do people refer to humous in a positive or negative manner? Is there a Big-Five personality grouping for them? That is perhaps something for another blog, but I think you can see that the foundations for these sorts of questions are now in place and we’ve been able to combine completely different services packed in self-contained environments (containers).
Let’s now transfer the environment to a cloud-based docker environment. There are other ways of achieving this, for example using Kubernetes, but we’ll cover Kubernetes in a later part of this series. The idea here is to show a very simple way of making a cloud-based data science service available based on a pattern that you already know works well in-house.
If you have been following along to the first two parts of this series and already have a resource group set aside for this project, then feel free to use it. Otherwise, it’s advisable to create a new resource group so that you can ring-fence the activities for this series.
In my case, I created a resource group called docker-rg
$ az group create --name docker-rg --location eastus
{
    "id": "/subscriptions/<subscription-id>/resourceGroups/docker-rg",
    "location": "eastus",
    .
    .
}
$
Now create a file called docker-init.txt with a single line in it:
#include https://get.docker.com
This provides everything you need to build a Docker environment within a virtual machine. Now we’ll provision a virtual machine with az vm create to hold that Docker environment and open a port to allow you to access it remotely. You’ll need to note the value of publicIpAddress. I’m choosing a default VM configuration here, but you can customise this to add more memory, disk or CPU as you wish. At the time of writing this, I can create a VM of size ‘B1ls’ with 1 CPU and 512MB of RAM for under $4 per month.
One nice thing with standard Azure VMs is that they come with a number of pre-configured services such as ssh already installed and running.
$ az vm create --resource-group docker-rg --name jm-docker-vm --image UbuntuLTS --admin-username jon --generate-ssh-keys --custom-data docker-init.txt

{
    .
    .
    "publicIpAddress": "xxx.xxx.xxx.xxx",
    "resourceGroup": "docker-rg",
    .
}
$
$ az vm open-port --port 8888 --resource-group docker-rg --name jm-docker-vm
{
    .
    .
}
$
Now ssh into the remote machine using the publicIpAddress from earlier and then install compose into it. We also have an option of providing an externally available Fully Qualified Domain Name (FQDN). Note that if we shut-down and restart our VM then the public IP address is likely to change and we’ll have to rediscover the new public IP address. Giving it a FQDN means that you should be able to reference the VM irrespective that its address is. More information about how to set this can be found here.
$ ssh jon@<your public IP address>
.
.
.
$ sudo apt install docker-compose.
.
.
$
Before we can move our application to the cloud, we’ll need to backup the local environment. All we really need are the contents from the storage volumes, and the configuration items. Remember that the containers, volumes, networks etc will all be rebuilt from scratch. This is the beauty of a containerised approach. We don’t need to back any of that up.
Stop each of the running containers noting the container name.
$ docker-compose ps
       Name                    Command             State            Ports
-----------------------------------------------------------------------------------
mc-1_jon_jupyter_1   jupyter notebook              Up      0.0.0.0:8888->8888/tcp
mc-1_jon_mongo_1     docker-entrypoint.sh mongod   Up      0.0.0.0:27017->27017/tcp
$
$ docker stop mc-1_jon_mongo_1
mc-1_jon_mongo_1
$ docker stop mc-1_jon_jupyter_1
mc-1_jon_jupyter_1
$ docker-compose ps
       Name                    Command             State    Ports
-----------------------------------------------------------------
mc-1_jon_jupyter_1   jupyter notebook              Exit 0
mc-1_jon_mongo_1     docker-entrypoint.sh mongod   Exit 0
$
We’re going to create a location for our backups and then run a container, whose sole purpose is to copy the contents of the volume’s mount point to that location and then exit. You can find the full mounted paths for each of these volumes in the docker-compose.yml file.
$ mkdir backup
$ docker run --rm --volumes-from mc-1_jon_mongo_1 -v $(pwd)/backup:/backup ubuntu bash -c 'tar cvf /backup/mongo-volume.tar /data/db'
tar: Removing leading `/' from member names
/data/db/
/data/db/WiredTiger.turtle
.
.
$
$ ls -l backup
total 328372
-rw-r--r-- 1 jon staff 333230080 Jun  1 11:26 mongo-volume.tar
$
Let’s also backup the Jupyter home directory
$ docker run --rm --volumes-from mc-1_jon_jupyter_1 -v $(pwd)/backup:/backup ubuntu bash -c 'tar cvf /backup/jupyter-volume.tar /home/jovyan'
tar: Removing leading `/' from member names
/home/jovyan/
/home/jovyan/.yarn/
.
.
$
$ ls -l backup
total 328592
-rw-r--r-- 1 jon staff    225280 Jun  1 11:30 jupyter-volume.tar
-rw-r--r-- 1 jon staff 333230080 Jun  1 11:26 mongo-volume.tar
$
Now backup the code used to build the environment:
$ tar zcvf backup/build.tgz config containers docker-compose.yml
a config
a config/jupyter.env
a containers
a containers/jupyter
a containers/jupyter/Dockerfile
a docker-compose.yml
$
$ ls -l backup/
total 328596
-rw-r--r-- 1 jon staff       766 Jun  1 11:47 build.tgz
-rw-r--r-- 1 jon staff    225280 Jun  1 11:30 jupyter-volume.tar
-rw-r--r-- 1 jon staff 333230080 Jun  1 11:26 mongo-volume.tar
We now have everything we need to rebuild our environment. However, In order to do that, we need to copy those files to our cloud VM. On our cloud VM, create a directory called backup in the home directory. Now, from our local machine, copy the backup directory to our target directory:
$ scp backup/* jon@xxx.xxx.xxx.xxx:backup
Enter passphrase for key '/Users/jon/.ssh/id_rsa':
build.tgz                         100%  766     9.2KB/s   00:00
jupyter-volume.tar                100%  220KB 421.6KB/s   00:00
mongo-volume.tar                  100%  318MB 996.2KB/s   05:26
$
And we can now extract the contents to build our cloud application
$ tar zxvf backup/build.tgz
config/
config/jupyter.env
containers/
containers/jupyter/
containers/jupyter/Dockerfile
docker-compose.yml
$
For security reasons, docker is not generally available to non-privileged users. It therefore requires using sudo for each call. We can avoid this by adding our current user to the docker group and switching to that new group. This group should have been automatically created for you.
$ sudo gpasswd -a $USER docker
$ newgrp docker
$
$ docker-compose up -d --build
Creating network "jon_default" with the default driver
Creating volume "jon_jupyter_home" with default driver
Creating volume "jon_mongo_data" with default driver
Building jon_jupyter
.
.
.
ab4327c34933: Pull complete
80003bc32b79: Pull complete
Digest: sha256:93bd5412f16f3b9f7e12eb94813087f195dad950807a8ca74aa2db080c203990
Status: Downloaded newer image for mongo:latest
Creating jon_jon_jupyter_1 ...
Creating jon_jon_mongo_1 ...
Creating jon_jon_jupyter_1
Creating jon_jon_mongo_1 ... done
jon@jm-docker-vm:~$ docker-compose ps
      Name                  Command          State   Ports
--------------------------------------------------------------------------
jon_jon_jupyter_1 jupyter notebook             Up   0.0.0.0:8888->8888/tcp
jon_jon_mongo_1   docker-entrypoint.sh mongod  Up   0.0.0.0:27017->27017/tcp
$
Let’s test whether the notebook is accessible by going to the external IP address on port 8888

We can reach it, but for security reasons, we’ll need to know the token before we can do so. As we did before, we can find out that value, but we don’t want to have to do this every time the server comes up or if we restart the notebook. Let’s find our token and then set a password. Make sure to use the change password section below, and not the login section at the top. On your remote VM, do the following:
$ docker-compose ps

       Name                    Command           State   Ports
-------------------------------------------------------------------------------
jon_jon_jupyter_1  jupyter notebook             Up     0.0.0.0:8888->8888/tcp
jon_jon_mongo_1    docker-entrypoint.sh mongod  Up     0.0.0.0:27017->27017/tcp

$ docker exec jon_jon_jupyter_1 jupyter notebook list

Currently running servers:
http://0.0.0.0:8888/?token=?d336b5cb3bf35476952c59ea566e74cf1b66a692e307e146:: /home/jovyan
In future, you should be able to log in using just the password.
In order to restore the contents of our volumes, we’ll first need to know what those volumes are called in our Azure VM.
$ docker volume ls
DRIVER      VOLUME NAME
local       2e6cd60d75b1cc213ed23f9b2f46644d6215baafdca9be77f2fea8409a34ecd
local       jon_jupyter_home
local       jon_mongo_data
$
Stop the cloud VM application and we’ll write the backup contents over our pre-created volumes.
$ docker-compose down
Stopping jon_jon_mongo_1   ... done
Stopping jon_jon_jupyter_1 ... done
Removing jon_jon_mongo_1   ... done
Removing jon_jon_jupyter_1 ... done
Removing network jon_default
$
First I’ll restore the Jupyter contents. Here, we mount our home directory and a temporary location from our backup, and then copy the contents from one to the other. This is all done in a temporary container whose sole task is to do the copy.
$ docker run --rm -v jon_jupyter_home:/home/jovyan -v $(pwd)/backup:/backup ubuntu bash -c 'cd / && tar xvf /backup/jupyter-volume.tar'
home/jovyan/
home/jovyan/.yarn/
home/jovyan/.yarn/bin/
home/jovyan/.cache/
home/jovyan/.cache/matplotlib/
home/jovyan/.cache/matplotlib/tex.cac
.
.

$
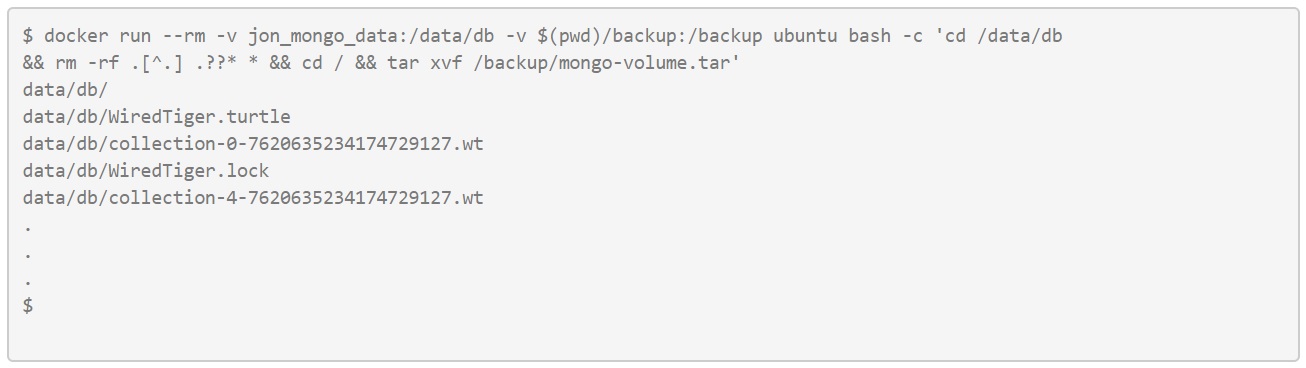
Now we’ll do the same with the Mongo database. I’m taking the added precaution of removing the contents from the target volume here.
Now start the application:
$ docker-compose up -d
Creating network "jon_default" with the default driver
Creating jon_jon_jupyter_1 ...
Creating jon_jon_mongo_1 ...
Creating jon_jon_jupyter_1
Creating jon_jon_mongo_1 ... done
$
If I now go back to my Jupyter environment, you can see that our previous Untitled.ipynb file has been restored.
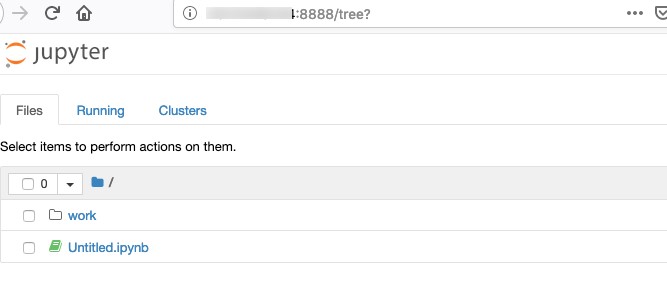
Clicking on this will now show the state of my work as it was in my local environment.
I can also go through each of these cells and test that the Jupyter environment behaves exactly as it did locally, and that my Mongo database is working properly.
Conclusion
This brings the third part of our series to an end. You saw how to create a multi-container application to support a data science scenario and then how to transfer the environment to the cloud. While we used a single cloud VM to host one multi-container application, that VM is capable of hosting multiple applications now.
There are clearly more efficient ways of achieving this, but I’ve taken the approach of delving more into the principles in the early stages than in focusing on best practice.
In future parts of our series, I’ll look at using PaaS services instead of having to maintain container-based ones. I’ll also introduce how to combine cognitive services, and additional security to make the data science discovery process a little faster.
About the author
 Jon is a Microsoft Cloud Solution Architect specialising in Advanced Analytics & Artificial Intelligence.
With over 30 years of experience in understanding, translating and delivering leading technology to the market. He currently focuses on a small number of global accounts helping align AI and Machine Learning capabilities with strategic initiatives. He moved to Microsoft from IBM where he was Cloud & Cognitive Technical Leader and an Executive IT Specialist.
Jon has been the Royal Academy of Engineering Visiting Professor for Artificial Intelligence and Cloud Innovation at Surrey University since 2016, where he lectures on various topics from machine learning, and design thinking to architectural thinking.