
Injecting lineage and attributes into Microsoft Purview – Part 1

“How do I easily find the data I’m looking for?”
“How do I know the data comes from a reliable source?”
These are common questions we hear from data consumers, particularly more so as the organisation starts to scale it’s data platform with numerous data sources and data producers. Identifying the right datasets across a vast array of data stores or a heap of catalog search results can be a challenging and time-consuming process. Enriching these consumption-worthy assets with additional business and technical metadata will form part of the solution. This two-part blog describes and demonstrates how to easily add lineage and attributes in order to improve the data consumer’s experience.
Current capabilities
Automatic lineage collection in Microsoft Purview is currently only supported by certain ADF activities and Synapse activities. No doubt this will expand over time, however you may wish to capture lineage from other engines such as Synapse Spark or Databricks. Whilst there is a Spark based lineage collector, as well as the Azure Databricks to Purview Lineage Connector based on Open Lineage, you can alternatively inject your own lineage programmatically — for every transformation or process which creates a new dataset there will need to be some additional code run in order to create the relationship or linkage between inputs and outputs. This solution requires data producers to become diligent about adapting their current and future (ETL) processes to “publish” this critical metadata to Purview, and this post aims to demonstrate one of the ways this can be achieved.
Classifications are a good way of describing technical metadata but often consumers need the business understanding/metadata to compliment this, in which case you may wish to assign attributes or tags to the data. The workflow engine in Microsoft Purview may very well evolve to automate this in the future but for the time being it will have to be a manual applied or a scripted process depending on the business rules/logic.
This blog post will show you how to inject both of these metadata elements into your Purview catalog, also known as the Purview Data Map. The full source code for this walkthrough can be found in this Github repository which includes notebooks with markdown comments, but for the remainder of this post we’ll go into a bit more detail. It assumes you have some understanding of Python and how to interact with the Purview using SDKs/APIs, which includes the prerequisites such as creating a service principal and assigning necessary roles.
Provenance and Process
To inject lineage between datasets which reside in ADLS (data lake) for example, we will use the superb Pyapacheatlas package by Will Johnson. Adapted from one of the sample notebooks in his repository, the notebook used in this blog can be found here. Ideally perform a git clone on the link to the repo above in order to download both notebooks used in this post.
To run the code, we’ll use Python in Synapse Spark, as this might be a common point of entry where data producers/engineers might run their data transformations and will know the inputs and output datasets to their process(es).
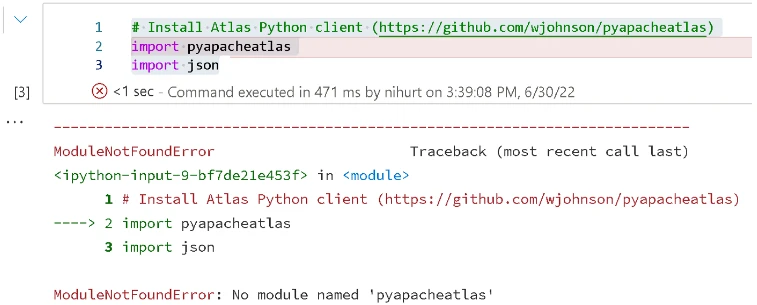
When using Python distributions bundled in Apache Spark, one typically needs to attach the libraries either to the cluster or the session, otherwise this happens:
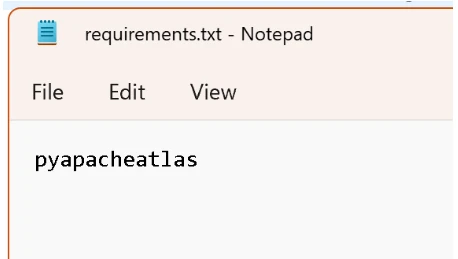
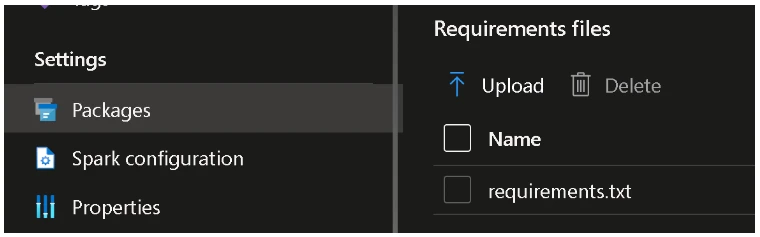
There are a number of ways to manage Python libraries in Synapse Spark however a simple approach is to create a requirements file:
…and upload it to the spark pool:
Once you have opened/imported the sample notebook into a Synapse Spark notebook, enter the Purview account and authentication details in cells 2 and 3. In summary, you’ll need to define (and optionally create) both the source and target assets/entities (using upload_entities) in cell 4, then in the following cell (5) create the relationship (lineage) between these inputs and outputs. If either the inputs or outputs don’t exist at the time, then no relationship can be created. If either exist, such as the input asset, it is not affected by this operation.
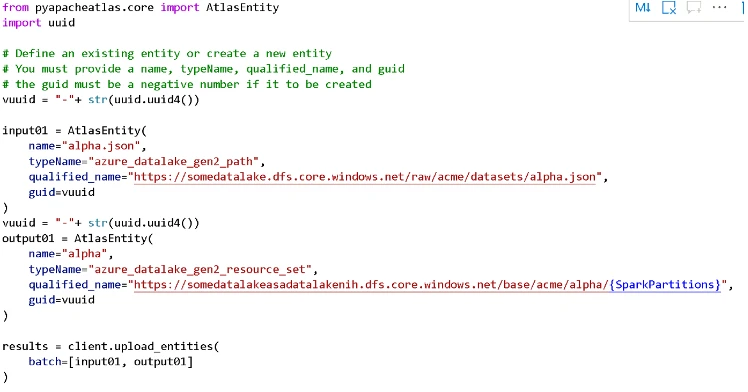
From a timing perspective, typically what may happen is that the input assets already exist in Purview, discovered via a scan, and a Spark job is going to make use of these to produce new assets or target outputs. For existing (scanned) assets, ensuring the fully qualified name is set correctly in the AtlasEntity section of the notebook (as shown below) avoids creating a duplicate asset. The qualified name can be found in the overview tab. Additionally, set the GUID which can be found in the URL when viewing the asset in the Purview UI. Alternatively this information can be obtained via the discovery_query API or the get_entity method which would make more sense if it is part of a scripted approach. Enter the entity name and type — for a full list of type names you can be obtained by using the GetEntityDefinition API.
Below is an image of the example input and output assets in the notebook. The input json file is going to be transformed by Spark into a set parquet files, which we know will be detected as a resource set. At this stage a scan has not been run on the input location, therefore we are using a new negative GUID to let Purview know this is a new asset.
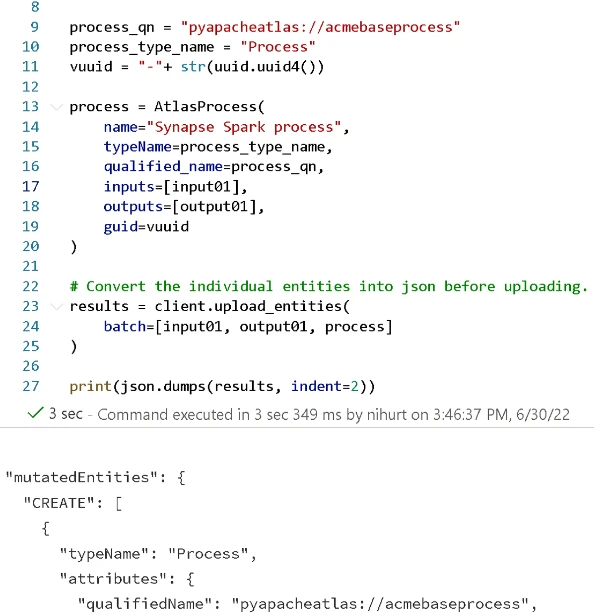
As mentioned, the upload_entities call ensures that both the inputs and outputs are created in the Data Map so that a relationship can be formed between them. For assets that haven’t been scanned and don’t yet exist in the Data Map, it simply creates a “placeholder” entity which is visible via the Purview UI. Then we can make a call to define the lineage artifact using the AtlasProcess class passing these input(s) and output(s) — see image below of cell 5. Make sure to specify a unique process qualified name (process_qn) for each new relationship otherwise you will end up overwriting an existing one with the same name, and existing lineage for the existing process will be lost! This means you may want to think about appending the process_qn with a unique GUID or task/backlog item number. The process type name should be “process” unless you wish to create your own process type using the typedefs API. For reference here is an example custom types definition. The name of the process can be anything which describes your process. Finally, the upload_entities call creates this relationship, making the lineage visible in the Purview UI.
Once you populate and run cells 1-5, you should see lineage between the assets. If not, Hit Refresh!

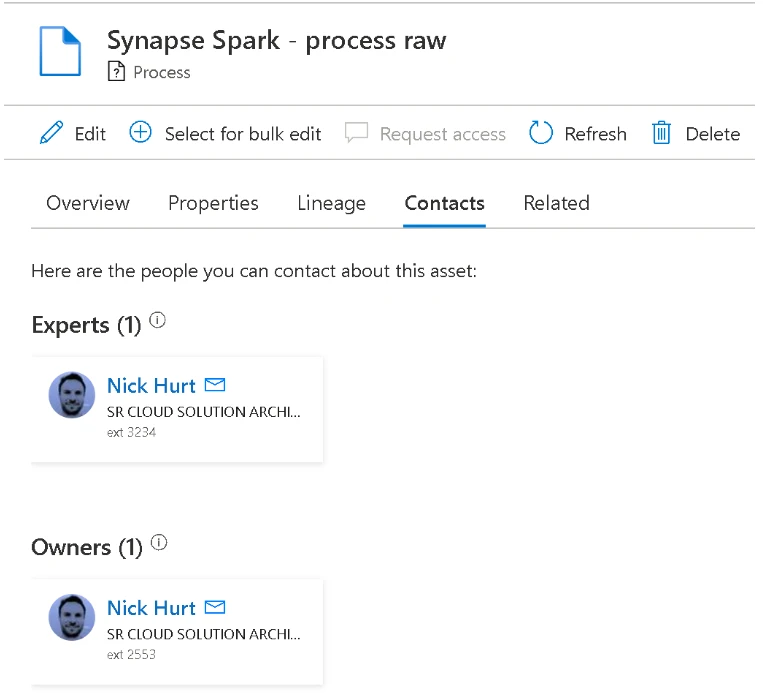
One can add additional attributes such as a description and owner/experts using their object IDs from AAD. This will enable your data consumers to know who to contact if they have questions about the process. An example is shown below which defines whether the contact is an expert or owner, the AAD object ID and an info field, which can be any text string such an extension number for example.
process = AtlasProcess(name="Synapse Spark - process raw",
attributes={"description":"Spark job to transform raw files into standized format"},
contacts={"Expert":[{"id":"aaaaaaa-0000-000a-aa00-0a000a0000a0","info":"ext 3234"}],"Owner":[{"id":"aaaaaaa-0000-000a-aa00-0a000a0000a0","info":"ext 2553"}]},
Now you have seen how to inject lineage programmatically, it’s time to think about how this could be included as a repeatable step in your business’ data pipelines. Ideally you may want to convert these cells 1–5 into a library so that they can be called in a single function call, passing the required information as parameters. As part of a data pipeline, the engineer will most likely be referencing these (fully qualified) data asset paths for source and target, unless they are using mounts in which case these will need to be translated (ideally programmatically) to the full path otherwise one will end up with duplicate assets in the data map — (1) the injected asset and (2) the scanned asset.
In reality you may have a number of source-to-target transformations, and often multiple source datasets are required to produce a single target dataset – this is more representative of a full analytics (ETL) pipeline. You will see an example of this in the last cell of the notebook. To achieve this, simply define multiple input sources (and possibly multiple output targets), and for each new target asset being produced, simply repeat the process of defining inputs/outputs, AtlasProcess and making the upload_entities call. You may end up with something like this to represent a more realistic pipeline which depicts the standardisation of some data before joining them to produce a final target dataset.

In Part 2, we take a look at how you can inject attributes to enrich the metadata about your assets.
Learn more
- Injecting lineage and attributes into Microsoft Purview – Part 2
- Secure Access to Storage: Azure Databricks and Azure Data Lake Storage Gen2 Patterns
- Just-in-time Azure Databricks access tokens and instance pools for Azure Data Factory pipelines using workspace automation
- Configure access to Azure Data Lake Gen 2 from Azure Databricks